1. Quick start
Cam-Wise works differently from a regular camera app: it doesn’t just detect “motion” — it learns from your feedback what actually matters to you. The shortest route from new user to your own working detection looks like this:
- Pick a camera — connect the camera whose footage you want to use, for example your front door camera or the one overlooking the driveway.
- Create a detection target — describe what you want to recognize, for example “Alex’s car” or “Parcel courier”.
- Review images — in Review, decide per image: is this a good example, do I skip it, or is it a counter-example?
- Check your dataset — make sure your collection of examples is right: enough of them, varied, correctly labeled.
- Train — let Cam-Wise build its own model version from your examples.
- Test the model — see what the new model does and doesn’t recognize on real footage.
- Improve — add examples for the situations the model got wrong, and train again.
That last step isn’t an exception — it’s the normal rhythm. Cam-Wise improves in rounds. Every round of feedback — a few good examples, a few counter-examples — makes the next model version a bit smarter for your situation.
2. What makes a good detection target?
A detection target is the name of what you want to recognize. Cam-Wise trains a separate recognition per target, so the more concrete the target, the better the result. Good examples:
- “Alex’s car” — one specific car, recognizable by shape and color.
- “Neighbor’s cat” — one specific animal that regularly visits your garden.
- “Parcel courier” — a recognizable category: someone with a package at your front door.
Overly broad targets work poorly. “Anything that moves”, “something suspicious” or “people and cars and animals” are not good detection targets: the model can’t tell what exactly it should learn, and you can’t review the examples consistently. If you often find yourself doubting whether something “counts”, your target is probably too broad.
One target or several?
- One detection target is enough if you want to track one thing: is Alex’s car on the driveway, yes or no.
- Multiple detection targets are useful when you want to recognize different things separately: for example “Alex’s car” and “Neighbor’s cat”. Each target gets its own examples and its own color during review, so the collections never get mixed up.
3. Reviewing images in Review
In Review you see images Cam-Wise extracted from your camera footage. Your judgment determines what the model learns. Per image you roughly have these choices:
When do you choose positive?
Choose positive when the object of your detection target is clearly recognizable in the image: Alex’s car visibly on the driveway, the courier at the front door. Then draw (or verify) the box around the object and pick the right detection target as its label.
When do you skip?
Skipping is the right choice more often than you’d think. Skip when:
- the image has nothing to do with your detection target (a passer-by, a bird, an empty street);
- the object is in the image but so unclear that you would be guessing;
- you already saved many near-identical images of this exact moment.
Skipping is not “throwing away”: it only means this image won’t be used as teaching material. A skipped image does no harm; a badly labeled one does.
When do you choose counter-example?
Choose counter-example when Cam-Wise mistook this image for your detection target, but it isn’t: a different car in the spot where Alex’s car usually parks, the garbage bin in front of the camera, a shadow that looks like a cat. See chapter 9 for when this is useful.
When do you use doubt/unsure?
Genuinely can’t tell — is that the neighbor’s cat or a different cat? Then mark the image as doubt, or skip it for now and come back later. Forcing a doubtful case into positive or counter-example does more damage than letting it sit.
Special cases
- Image without a relevant object: skip. Only if the model wrongly recognized it as your target is it a candidate counter-example.
- Very dark or blurry image: can you still clearly recognize the object yourself? Then it can be positive — night images are actually valuable. Would you be guessing? Skip.
- Duplicate images: near-identical images from the same moment add little. Keep one (the clearest) and skip the rest.
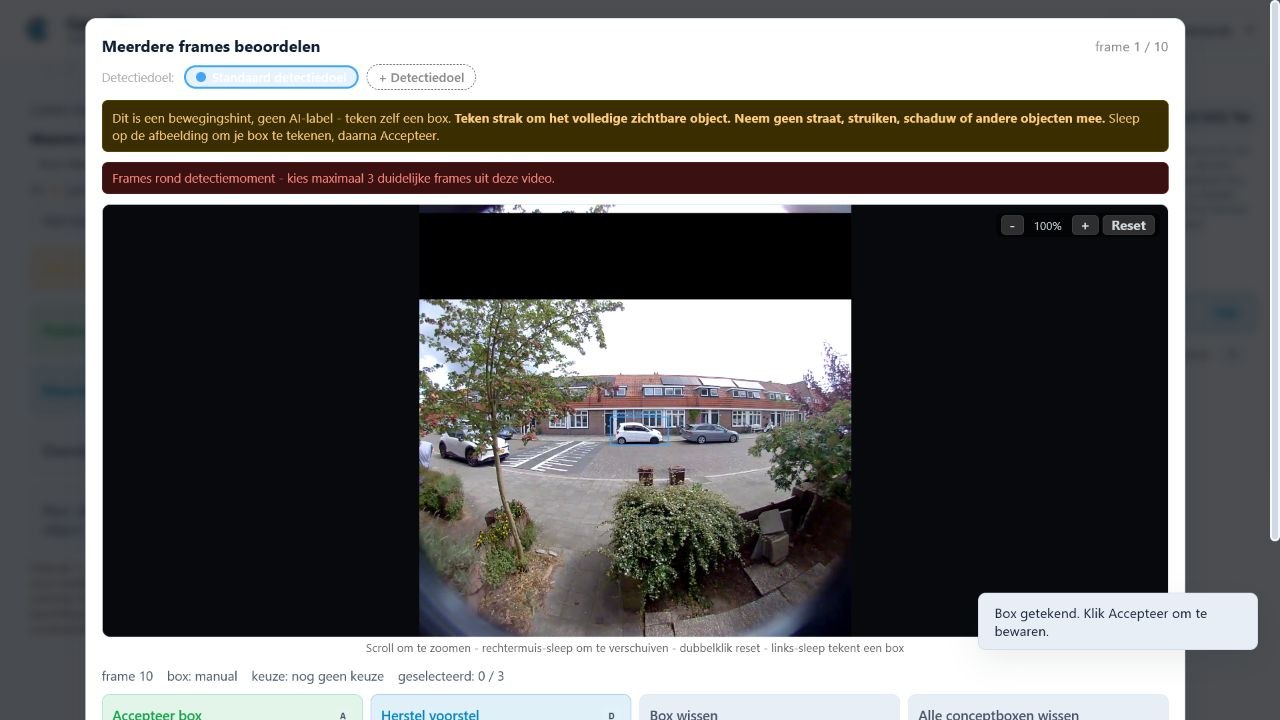
4. Drawing boxes: what is a good box?
Every positive example comes with a box: the frame that marks where the object is. The quality of your boxes directly determines how well the model learns to look.
The basic rules
- Tight around the object. The box follows the edges of the object, not the scenery around it.
- Not too much background. A box with half the driveway in it teaches the model that the driveway is part of the car — you don’t want that.
- Not too small. Don’t cut off visible parts of the object; a box that only covers the car’s roof is too tight.
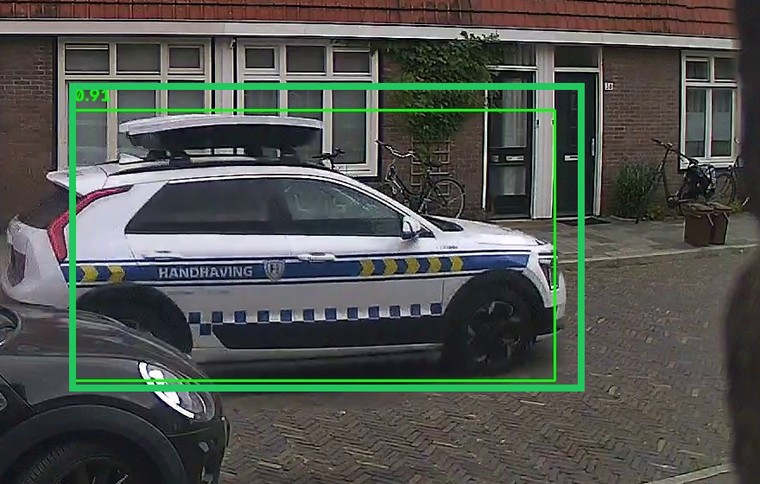
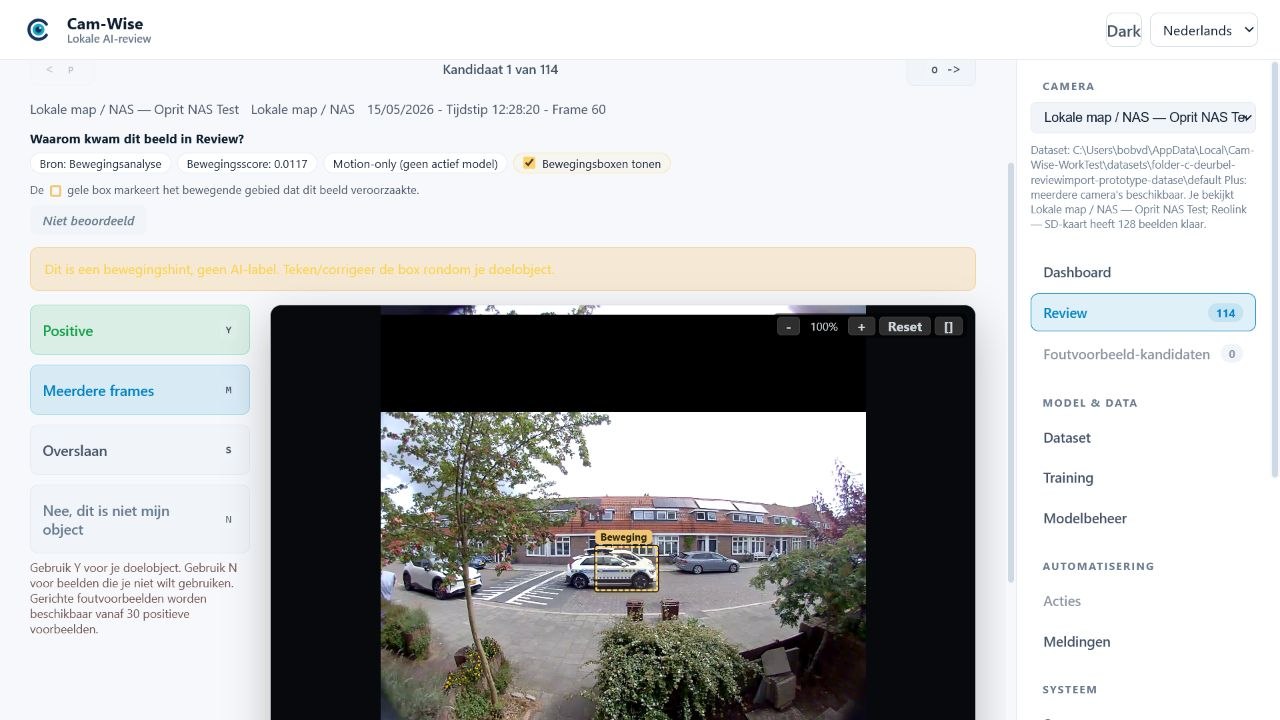
Object partly visible or half out of frame
- Use it when this happens often in practice and the object remains clearly recognizable. Does Alex’s car always drive halfway into the frame before parking? Then those half views are valuable — draw the box around the visible part.
- Skip it when so little is visible that you only “know” what it is from context. A corner of a bumper is not a good example.
Difficult conditions
- Reflections and windows: never draw a box around a mirror image or reflection; that’s not the object itself.
- Shadows: the shadow is not part of the object. Box the car, not the car plus its shadow.
- Rain and night: fine examples as long as the object is recognizable. Headlights with so much glare that only light blobs are visible: skip.
Multiple objects in one image
If several relevant objects are in the frame — Alex’s car and the neighbor’s cat — draw a separate box per object and pick the right detection target per box. Objects that don’t have a detection target get no box.
5. Detection targets as colored labels
During review your detection targets act as labels: for each box you choose which target it belongs to, for example “Alex’s car” or “Neighbor’s cat”. Each detection target has its own color and the box takes that color — so you can see at a glance what you labeled.
- Always pick the detection target deliberately per box; the color is your visual check.
- Each approved example lands in the collection (dataset) of that specific detection target — examples of “Alex’s car” never accidentally train “Neighbor’s cat”.
- In Dataset you can later see per detection target what you collected: how many positive examples, how many counter-examples.
- In Model management you can see per detection target which model versions were trained with it.
6. How many examples do you need?
There is no magic number, but these guidelines usually hold up in practice:
| Positive examples | What to expect |
|---|---|
| 10–15 | A first impression; recognition is still weak and inconsistent. |
| 15–30 | Enough for a first test model to experiment with. |
| 30–50 | A usable base for daily use. |
| 50–100 | Usually noticeably stronger and more stable. |
| 100+ | Only useful if there is real variety — 100 copies of the same image add nothing. |
More important than the count is the quality and variety of the examples. Thirty different, well-labeled images beat a hundred near-identical ones. See the next chapter.
7. Variety: different beats more of the same
A model learns from differences. Many near-identical images teach the model only one situation — and as soon as reality deviates a little (different light, different angle), it recognizes nothing. Useful variety includes:
- day / evening / night;
- rain / dry weather;
- close by / far away;
- fully visible / partly visible;
- different angles (arriving, parked, driving off);
- with and without headlights on;
- the object next to other objects (the car next to a visitor’s car, the cat next to the garbage bin);
- different seasons and light conditions (low sun, snow, autumn leaves).
Bad dataset enrichment
Adding 30 frames from one video of the same parking maneuver. That’s 30 “examples”, but the model learns one situation from them — and your counter looks misleadingly high.
Good dataset enrichment
Picking 1–2 good frames from each of 5 different videos (morning, evening, rain, a different parking spot, with a visitor’s car next to it). Ten images, five situations: that’s what genuinely improves a model.
8. Which frame do you pick from a video?
From a single video you often get several candidate frames, each with a confidence score (how sure the model is). Important to know:
- Don’t automatically pick the frame with the highest confidence. If one frame has confidence 90 and another 70, that only says what the current model finds easy — not what makes a good teaching example.
- Pick the frame that shows the object most clearly, most completely and most representatively.
- Confidence is a tool, not the truth. A lower-confidence frame can be more valuable: it may show an angle or light situation the model still struggles with — exactly what it needs to learn.
- Don’t use many near-identical frames from the same video; pick a few good, different frames instead.
9. Using counter-examples
A counter-example is an image that looks like your detection target but isn’t it. Think of: a different (similar) car on the driveway, the garbage bin in the spot where the cat always sits, a shadow shaped like a person, a bicycle the model mistakes for a courier, a bush moving in the wind.
- Counter-examples are most useful after you have a first model: then you can see where the model concretely goes wrong, and correct exactly those mistakes.
- Not every bad image is a counter-example. A blurry or unclear image that the model did not mistake for your target should simply be skipped. Use counter-example only when the model (or you at first glance) wrongly took the image for the target.
- Counter-examples belong to a specific detection target: “a different car” is a counter-example for “Alex’s car”, not for “Neighbor’s cat”.
- Use counter-examples deliberately to reduce false alerts: every recurring mistake you add as a counter-example becomes less likely in the next model version.
10. Checking your dataset
In Dataset you see, per detection target, what you have collected:
- Positive examples — images with a box and label the model uses as “this is it”;
- Counter-examples — images the model uses as “this is not it”;
- the breakdown per detection target, so you can see which target still needs attention.
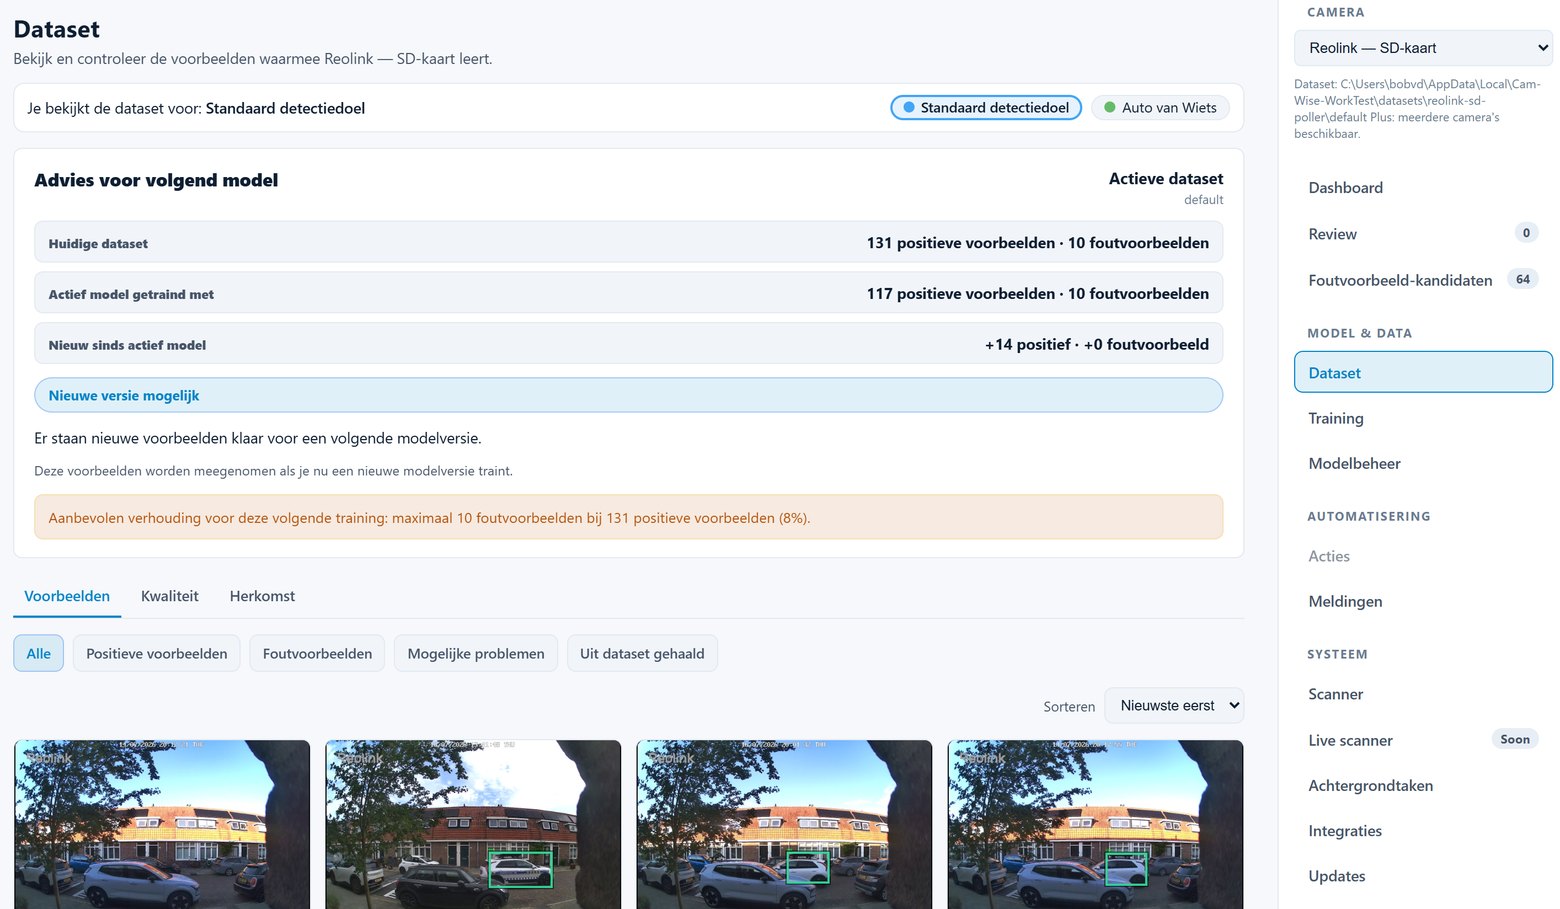
Walk through your dataset calmly every now and then, especially before training. Watch for:
- Enough examples? See the guidelines in chapter 6.
- Too many identical images? Thin out series of near-identical frames.
- Wrong labels? A cat labeled as a car poisons both targets at once.
- Bad boxes? Too loose, too tight or drawn around the shadow — fix them or remove the example.
- Counter-examples that are actually positive? One truly positive image among the counter-examples actively works against your model.
- Swapped detection targets? Check for off-color boxes between similar images.
11. Training: when and why?
Training means: Cam-Wise builds a new model version from your current dataset. The previous version stays available; you can always compare and roll back.
- Don’t train after every single example. One new image changes little; training takes time and mostly yields a near-identical version.
- Train after a useful batch — for example after 10–20 new, varied examples, or after adding targeted counter-examples.
Good moments to retrain:
- you have collected enough new positive examples;
- you added counter-examples for a recurring mistake;
- the current model regularly misses something it should see;
- the current model regularly detects something it shouldn’t.
12. Epochs, explained simply
Epochs = how many times Cam-Wise practices on all your examples during training. With 10 epochs the model looks at every image in your dataset 10 times, each pass slightly better tuned.
- Too few epochs: the model hasn’t practiced enough and may not learn your examples well.
- Too many epochs: the model starts to fit your exact examples too closely — it knows them by heart, but gets worse at new, slightly different situations.
Safe guidelines:
- Unsure? Use the default setting. It’s chosen to work well for most datasets.
- First model: keep it at default or low — you first want to see where it goes wrong, not train to the maximum right away.
- Bigger, more varied dataset: training somewhat longer can then make sense.
- Never crank it to extreme values at random “because more must be better” — that often backfires.
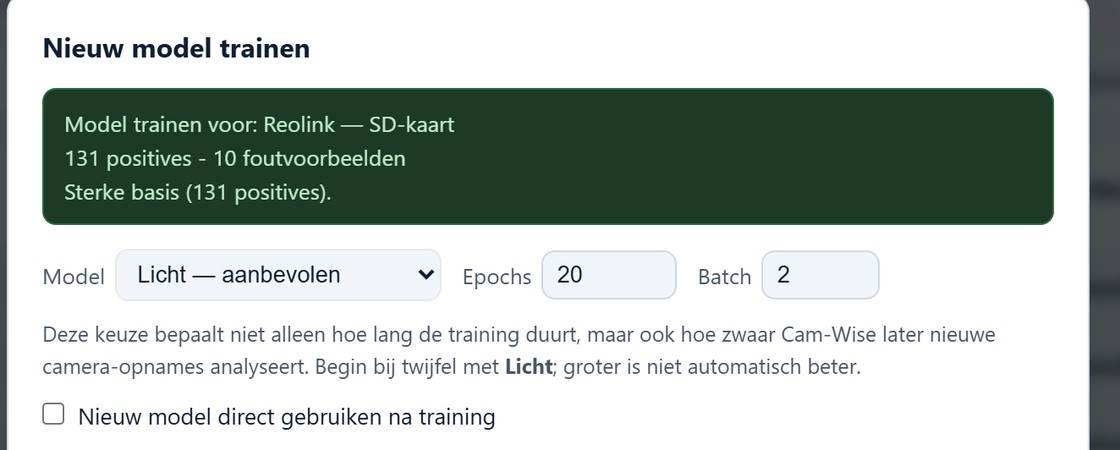
13. Batch, explained simply
Batch = how many examples Cam-Wise processes at the same time during training. Compare it to doing the dishes: you can carry three plates at once or one at a time — the end result is clean dishes, but pace and load differ.
- Bigger batch: can train faster, but needs more of your computer’s memory.
- Smaller batch: slower, but safer on lighter PCs.
Advice:
- Unsure? Leave the default value.
- Training crashes or your computer runs out of memory? Lower the batch.
- Training runs stable? Change nothing. Batch is not a dial that makes the model smarter.
14. Model management and versions
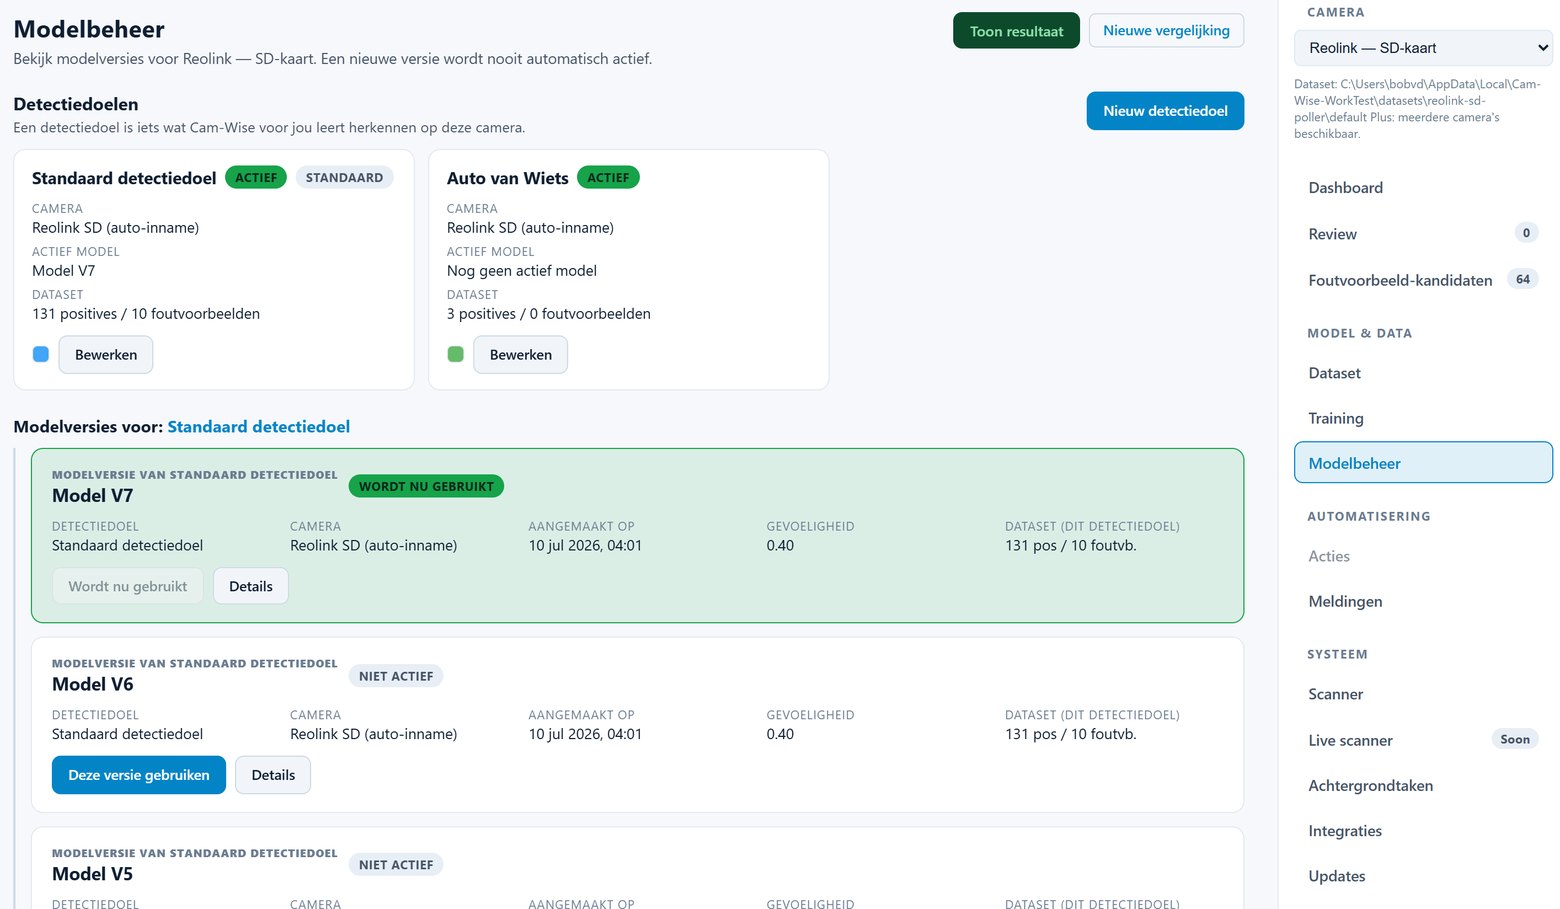
Every training produces a new version: Model V1, V2, V3, and so on. Version numbers belong to a detection target — the detection target is the name of what you recognize, the version is how far that recognition has progressed.
- A new version does not become active automatically. You decide which version your cameras use.
- You can always go back to a previous version if the new one disappoints.
- Don’t compare on a single image. One lucky or unlucky image says little; look at several situations (day, night, close, far) before judging.
Is the new version worse? It happens, and it’s no disaster:
- Set the previous version back as the active one.
- Look at the situations where the new version went wrong.
- Add examples or counter-examples for exactly those situations.
- Train again and compare again.
15. What if Cam-Wise doesn’t detect something?
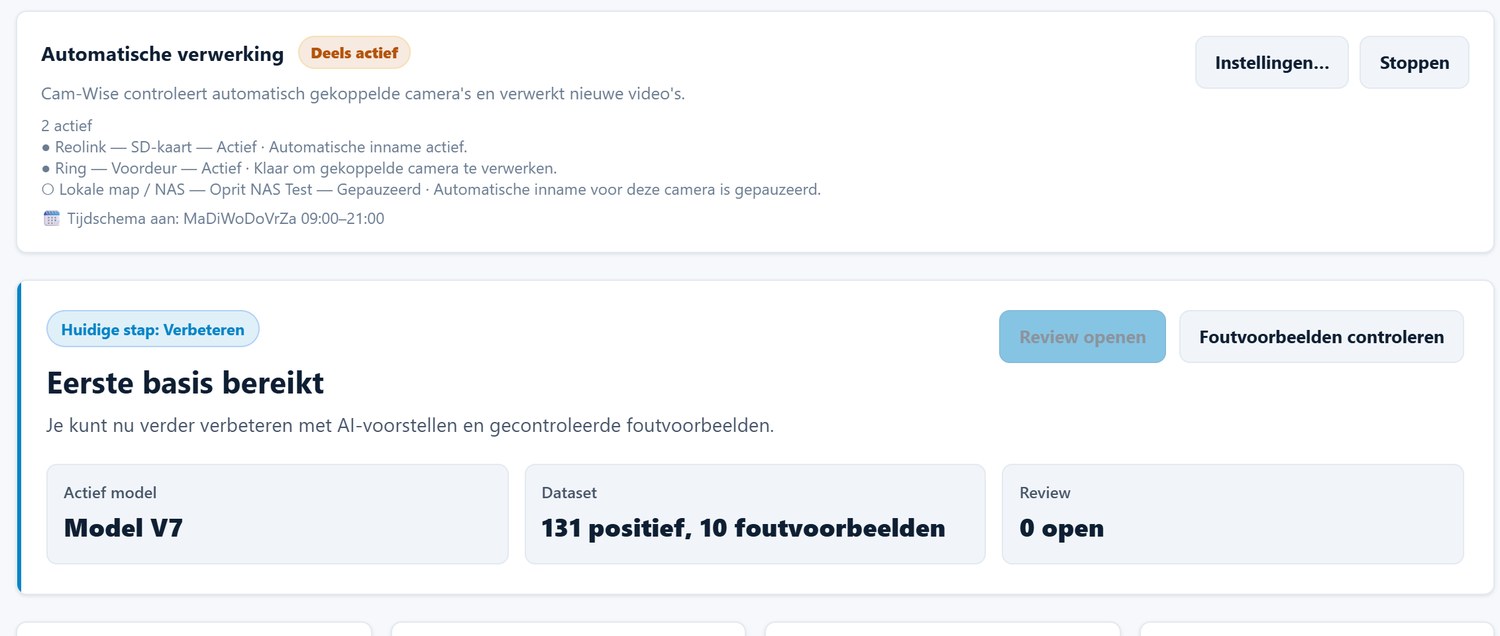
The car was on the driveway, but Cam-Wise didn’t see it. Work through these steps in order — the cause is more often at the start of the chain than at the end.
Step 1: Did the camera see the object?
- Is the object really within this camera’s view, or just outside the viewing angle?
- Was the camera active at that moment?
- Did the camera or integration record that moment? No recording = nothing to detect.
Step 2: Is the image usable?
- Too dark to recognize anything yourself?
- Object too far away or too small in the frame?
- Motion blur (smearing in the image)?
- A reflection, dirt on the lens, or a window in between?
If you can barely see the object yourself, the model can’t either. That’s not a model problem — it’s an image problem.
Step 3: Is this kind of situation in the dataset?
- Do you have examples of this kind of moment — night, rain, this distance?
- Is this angle or light situation already in your dataset, or is it new to the model?
Step 4: Is the right detection target selected?
- Not accidentally reviewed under the wrong target (the label “Neighbor’s cat” on the car)?
- Are the boxes of the existing examples correct?
Step 5: Is the sensitivity/threshold too strict?
- A lower review threshold shows more candidates — useful to find out whether the model did see the object but stayed just under the threshold.
- Don’t raise the trigger threshold (for alerts and actions) too high too early; do that only once the model has proven stable.
Step 6: Retrain with better examples
- Add a few good examples of exactly the missed situation.
- Add counter-examples if there is confusion with something similar.
- Train a new model version and compare before you activate.
16. What if Cam-Wise gives too many false alerts?
The model sees Alex’s car in every white car, or reports the cat at every shadow. Work through these steps:
- Check your boxes. Loose boxes are the classic cause: the model learned background and now reacts to that background.
- Add targeted counter-examples. Mark exactly the images the model gets wrong (that other white car, that shadow) as counter-examples for the right detection target.
- Raise the trigger threshold carefully. A small increase filters out doubtful cases; a big increase only masks the problem and costs you real detections.
- Add more variety to your positive examples, so the model learns more sharply what makes the object unique.
- Check whether your detection target is too broad. “Car” will logically alert on every car; “Alex’s car” won’t.
- Train a new version and compare with the previous one before switching.
17. What if Review shows too many images?
Reviewing hundreds of candidates a day isn’t sustainable — and it isn’t necessary. Here’s how to make it manageable:
- Raise the review threshold carefully. You’ll only see candidates the model is more confident about. Do this step by step, or you’ll miss exactly the instructive borderline cases.
- Skip generously. Bad images and duplicates don’t need a verdict; skipping is free.
- Review in batches. Ten focused minutes once a day or every few days works better than constantly keeping up.
- Use counter-examples only where they really help (recurring confusion) — not as a dismiss button for every irrelevant image.
- Check your scanner and import settings. If the intake is set too wide (for example, everything on every motion), you’re mopping with the tap running.
18. Common mistakes
- Using too many identical frames — high counts, little learning effect (see chapter 7).
- Drawing boxes too loosely — the model learns background and starts reacting to it.
- Always keeping half or unclear objects — partly visible is fine, but only while it stays recognizable.
- Using counter-example where skip is better — counter-examples are for concrete confusion, not for junk.
- Training with too few examples — below ±15 it becomes guesswork; collect a bit more first.
- Trusting a new model immediately without comparing — new version ≠ better version.
- Making detection targets too broad — “anything that moves” is not a target, it’s a problem.
- Picking the wrong color/label during review — check the box color before saving.
- Training for the wrong camera — examples from the backyard camera don’t help the front door model; every viewpoint is its own situation.
19. Recommended workflow per phase
First start
Calmly collect 15–30 good, varied positive examples. Don’t train on 5 images yet; no counter-examples needed yet either.
First model
Train, and then focus on studying the mistakes: what does the model miss, where does it go wrong? That determines your next step — not collecting more of the same.
Improvement phase
Add exactly what’s missing: counter-examples for recurring mistakes, positive examples for missed situations (night, rain, another angle). Train per useful batch, compare versions.
Stable phase
The model works to your satisfaction: only train when something genuinely changes — a new season, a different parking spot, a new recurring mistake. Occasionally walking through the dataset is enough maintenance.
Multiple detection targets
Build targets one at a time. Bring the first target to the improvement or stable phase before going all-in on the second; that keeps reviewing manageable and quality high.
20. Short checklist before training
- ✓Right camera selected.
- ✓Right detection target selected.
- ✓Enough positive examples (guideline: at least 15–30).
- ✓Enough variety (light, distance, angle, weather).
- ✓Bad and duplicate images skipped, not labeled.
- ✓Counter-examples checked (nothing positive slipped in?).
- ✓Dataset briefly reviewed for labels and boxes.
- ✓Training settings at default, unless you have a concrete reason to change them.
21. Short checklist after training
- ✓New model version reviewed on real footage.
- ✓Compared with the previous version, across several situations.
- ✓Not activated automatically without that check.
- ✓When in doubt: kept the previous version active.
- ✓Fed the mistakes you found back into Review and Dataset (new examples or counter-examples).
22. Frequently asked questions
How many images do I need?
Guideline: 15–30 for a first test model, 30–50 for a usable base, 50–100 for a stronger model. Variety counts more than raw numbers — see chapter 6.
Do I have to keep every frame?
No. Pick a few good, different frames per video and skip the rest. Near-identical frames add little.
Is confidence the same as quality?
No. Confidence says how sure the current model is, not how good the image is as a teaching example. A lower-confidence frame can be more valuable precisely because it shows something the model doesn’t know well yet.
What do I do with half objects?
Use them if the object stays clearly recognizable and the situation occurs often in practice; skip them if you’d be guessing. Always box only the visible part.
What is a counter-example?
An image that looks like your detection target but isn’t it — a different car, a shadow, the garbage bin. You use it to reduce false alerts. See chapter 9.
When do I retrain?
After a useful batch of new examples, after adding counter-examples, or when the model regularly misses something or detects something wrongly. Not after every single image.
What is batch?
How many examples are processed at the same time during training. Leave it at default; only lower it if you run into memory problems. See chapter 13.
What are epochs?
How many times the model practices on all your examples during training. Too few = too little learned; too many = memorized and worse on new situations. The default is almost always right. See chapter 12.
Why does the camera see something but Cam-Wise doesn’t?
Usually: there is no usable recording of the moment, the image is too dark/small/blurry, or the situation isn’t in your dataset yet. Work through the steps in chapter 15.
Why does Cam-Wise see something I don’t care about?
The model confuses something with your detection target. Add the mistake as a counter-example and retrain — see chapter 16.
Can I use multiple detection targets?
Yes. Each target has its own examples, its own color during review and its own model versions. Do build them one at a time.
Can I go back to an older model?
Yes, always. Versions are kept in Model management; you choose which version is active and can switch back at any time.